An excavation rarely finds a house. It finds a ring of dark stains in the soil, a scatter of broken pottery, a patch of burned earth and some charred seeds. A reconstruction drawing is the step where those pieces become a picture of people living their lives.
A site close to home
I grew up in the wetlands near the Pee Dee River, so the Kolb site has always felt close to home. It lies on the Great Pee Dee River in Darlington County, South Carolina, on land that is now a state heritage preserve. A local amateur archaeologist first recorded it in the 1970s, and an archaeology and education project excavated it over about twenty field seasons, with professionals, students and volunteers working side by side.
What makes the site so rich is time. People returned to this bend of the river again and again over thousands of years, camping there to hunt and fish, and much later it was the home of an eighteenth-century settler named Johannes Kolb, who gave the site its name. Even the river has a history: the channel beside the site was cut off by a landowner in the 1870s, so for most of its past the site sat on the main river rather than on the quiet backwater there today.
That depth is exactly what makes a reconstruction challenging. Each layer of soil belongs to a different time, and a good drawing has to choose one moment and stay faithful to it.
What a reconstruction really is
A reconstruction is a visual hypothesis. It says: given what was found, this is a reasonable picture of what happened here. It is not a photograph of the past, and it should never pretend to be one. Every element in the image needs a reason to be there, and the people who use the drawing should be able to find out what that reason is.
The process, step by step
1. Start with a question
Before any drawing, the archaeologist and I decide what the image has to explain. How a house was built? What a season of fishing camps looked like? How pottery was made and used? A clear question keeps the picture from becoming a crowded catalog of every find.
2. Gather the excavation evidence
This is the foundation, and it comes from the archaeologists' records:
- Features: post molds, the dark circles left where wooden posts rotted in the ground, reveal the outlines of structures. Hearths, pits and burned areas show where people cooked, stored food and worked.
- Artifacts: pottery, stone tools, beads and metal objects tell me what people held in their hands, and in what shapes and sizes.
- Plant and animal remains: charred seeds, nutshells and bones show what people ate and what grew and lived around them.
- Dates: radiocarbon results and diagnostic artifacts tie each piece of evidence to a period, which keeps objects from different centuries out of the same scene.
- The landscape: old river channels, soils and plant evidence let me draw the setting as it was, not as it is now.
3. Fill gaps with comparison, carefully
Some things almost never survive in the ground: clothing, hairstyles, baskets, wooden tools, the posture of someone at work. For these, the archaeologist points me to comparative sources, such as better-preserved sites, early written and drawn accounts, and experimental archaeology, where researchers recreate tools and techniques to see how they work. These sources are weaker than direct evidence, and the drawing should reflect that.
4. Choose a moment and a viewpoint
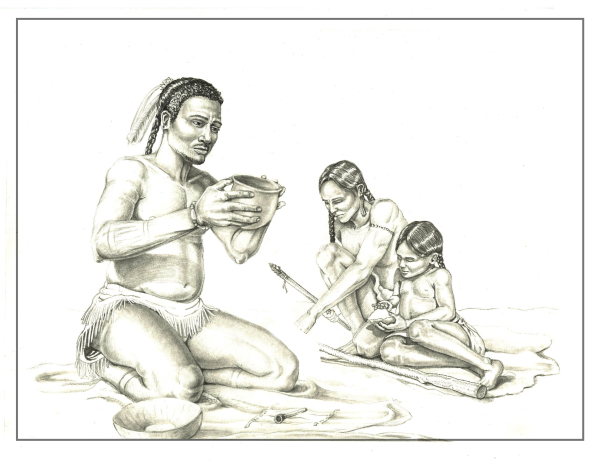
Then come small thumbnail sketches. A bird's-eye view explains a whole settlement. A close view of a few people explains activities and objects. In my Kolb site drawing I chose the close view, with a clay pot at the center: a man turns it in his hands while a woman and child work beside him. Putting people at the heart of the scene gives a sense of scale, and showing an object in use explains it better than any museum label.
5. Keep a reference log
For every element I note where it came from and how certain it is. A simple three-part scale works well: excavated evidence, reasonable inference and informed guess. When the evidence runs out, there are honest options. You can show the most likely version, keep the detail soft or in shadow, crop it out of the frame, or in some projects show two alternatives side by side.
6. Review, then review again
Pencil sketches go to the archaeologist before any finished rendering, because that is when corrections are cheap. If the scene depicts the ancestors of living people, I encourage the project to involve representatives of those communities in the review. They often bring knowledge the excavation record cannot.
7. Render in a medium that suits the evidence
I drew the Kolb scene in graphite. A monochrome drawing has a real advantage in reconstruction work: it does not claim to know the exact colors of skin, clothing or dyes that the soil cannot tell us, and viewers tend to read it as an interpretation rather than a snapshot. Color reconstructions can be excellent too, but every color becomes another decision that needs support. I compare the main media in Pen and Ink vs Watercolor for Science Art.
Common mistakes to avoid
- Mixing periods. At a site used for thousands of years, it is easy to put a pot from one era next to a tool from another.
- Modern bodies. Posture, build and the way people sit and work should come from the evidence and comparison, not from the illustrator's habits.
- Too tidy. Real places had smoke, debris, worn ground and half-finished work.
- Stereotypes. Clichéd costume and poses carry old assumptions. Evidence-based detail is the cure.
- Hiding the uncertainty. A caption or a short note on sources makes a reconstruction more trustworthy, not less.
Where reconstructions are used
Reconstructions appear in excavation reports and books, on museum and visitor center panels, on trail signs at the sites themselves, and in school programs. Because one drawing may end up in several of these places, it is worth agreeing on rights early. I cover that in Illustration Licensing: What Publishers Should Know.
If you are an archaeologist, a museum or a heritage site with a story to tell, see my page on archaeological reconstruction illustration, or read about my work for museums and nature centers. I would be glad to hear about your site.